
White balance is Lightroom is so important to delivering beautiful images, but it can sometimes be so confusing! Let me help you not only understand white balance in Lightroom but to be able to know intuitively how to use it to better your images. In this article, we will discuss the three major components needed to get the white balance of your images correct; white balance itself, exposure, and color saturation. These three key elements, when used together, allow you to get the perfect color in Lightroom.
What is white balance in Lightroom?
Before we get into how white balance can help you get the colors right in your image, let’s first begin with a definition of white balance. Did you know that all light has color to it? It’s true! And when that light hits a white object it casts its color upon the object. Our eyes and brains, being completely awesome, can remove that color cast and see the object as it should be truly white. Digital cameras, on the other hand, can’t do this and therefore your images are rendered with this color cast caused by the light source. I have written a pretty awesome and in-depth article on the white balance of digital cameras, check it out if you want to dive deeper into the subject. This is why it is called white balance. We are trying to balance the color cast of light to bring an actual white back to true white. Keep in mind, this color cast caused by light affects all colors in the image, we just talk about white because white is white, whereas blue to you might be azure to me. This article will not cover the white balance in your camera, as mentioned earlier I cover that in another article. This article will focus on how to fix or adjust the white balance to get the colors right in Lightroom when they were not captured correctly in camera. Ready? Let’s do this.
Power tip: Adjust the exposure first!
To get beautiful colors in your images, you need to start with exposure. As the brightness of a photo changes so does the color value of each pixel causing the colors shift. For this reason, adjust the exposure slider first, then proceed to the white balance sliders.

Use the exposure slider in the basic panel to get the exposure set correctly before trying to adjust your colors.
Learn the White Balance Sliders in Lightroom.
The white balance sliders are unlike those found in most other image editing programs. Generally you will find RGB sliders to adjust your color, but not in Lightroom. Instead you will find two sliders: temperature and tint. This is because Lightroom uses the LAB color space rather than the RGB color model. This can be confusing for some, but once you understand it, it actually is quite a bit more intuitive, at least in my opinion.

The Temperature Slider.
The temperature slider is the main slider you will adjust, and often will be the only slider that you need to use. We call it ‘temperature’ because the color of light is measured on the Kelvin scale by degrees. Therefore dropping the slider to a lower temperature will cool down the tones of your image by adding blues and purples. Conversely, raising the slider to a higher temperature will warm up the tones of your image by adding oranges and yellows. To really be good at color correcting your images, I don’t want you to think in terms of yellow and blue, rather of ‘cooling down’ or ‘warming up’ an image. By considering color in this way, you begin to understand color casts and how to fix them. Through balance. Take a look at the color wheel below. To remove an orange color cast, what color do you need to add?

Lightroom white balance presets.
A great way to think about finding balance is by understanding the type of light the image was shot in. If you have this information, half the battle is over. Lightroom provides you with presets that will adjust the sliders and give you a good starting point with the white balance sliders.

The presets available when shooting RAW files. You can use these presets as a good starting point to adjusting the sliders. By doing this, you allow Lightroom to start the editing process, and you come in and adjust to taste. For example, by setting the preset to Auto, you enable Lightroom to evaluate each image individually and try to get a correct balance of the colors. What’s left for you is to further refine the sliders for your style and taste. Be aware, if you are shooting JPEG instead of RAW, you will not get all of the preset options you see above. You will only get those you see below.

The only presets available when shooting JPEG images.
Fixing Color Casts with White Balance in Lightroom.
Let’s get down to business now and work on an image. Take a look at the image below. As you import photos into Lightroom, the software will default to the camera’s white balance used when the image was taken. You can see this by the preset drop-down menu being set to ‘As Shot.’


Lightroom has moved the sliders to a pre-determined default temperature to balance for tungsten lighting. Let me adjust it manually now. I want to warm my image up from where the tungsten slider had it set, so I will drag the temperature slider to the right and increase the color temperature to add warmth.

When dragging the slider to the right, I can visually see the image getting warmer and decided that the picture looked correct when I set the color temperature at 3,820°. Notice that the correct temperature is much closer to the ‘As Shot’ than it is to the Tungsten. This is because the drop-down menus are just default settings of the temperature for the selected type of light. Moving the sliders is the best way to achieve great color.
The Tint Slider.
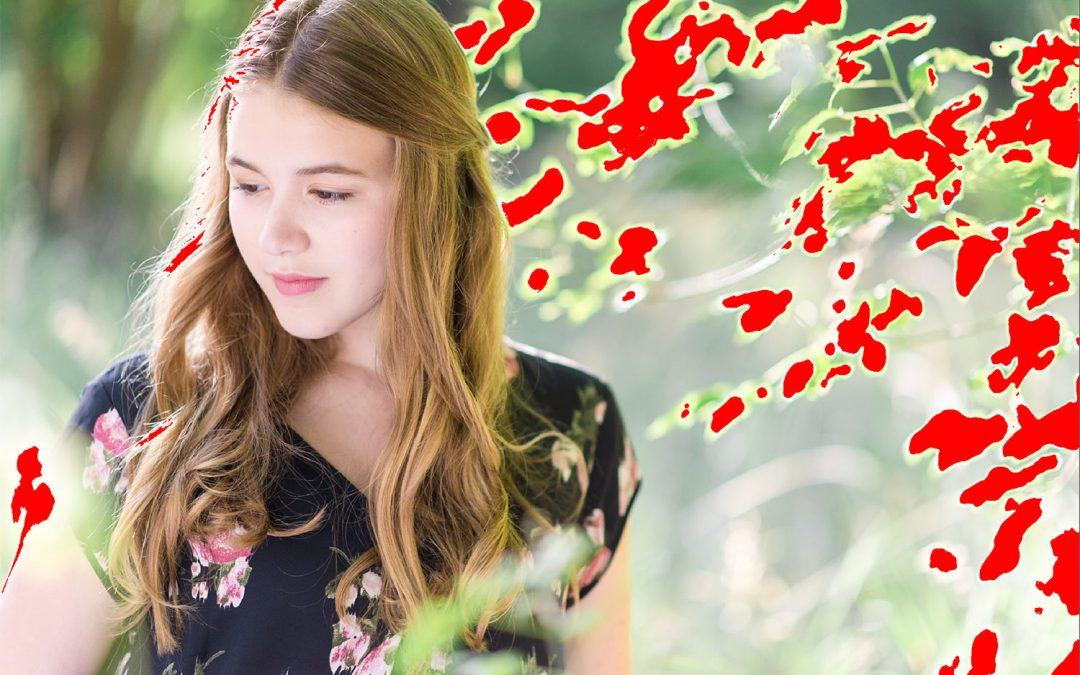
The tint slider is a slider that should be used sparingly. If used too much it will dramatically change the colors of your image; much more than you would prefer. Think of tint as adding or removing too much green or magenta from an image. Often, when shooting on grass, you will find that you have a green cast, this slider is a great way to remove that. If you’re looking to remove a bit of red from the skin tones, this is not the slider to use. We will talk about the sliders to use for that later in this article.

The main use for tint slider is if you are shooting around gas emitting lights. These types of lights, such as fluorescent and neon, often will require you to move the tint slider. For example, images shot under fluorescent lighting typically will have a green cast to them, something that is easily fixed by sliding the tint slider a bit to the right.
White Balance Selector Tool
Another easy way to get your white balance correct is to use the white balance selector tool. This tool allows you to tell Lightroom which color is a neutral color (pure gray) allowing Lightroom to adjust all of the other colors based on that neutral point. The tool looks like an eyedropper in the WB panel, and you select it by merely clicking on it.

Once selected, your mouse cursor will become the tool, and your job is to find a spot in your image that is neutral. You do that by watching the RGB numbers as you hover over areas in your picture. A neutral spot will be a location where all 3 of the RGB numbers are the same or very close to being the same. Take a look at the image below.

All 3 of my RGB values are very close: R:24.9 G:23.2 B:20.2. To accept this location, I just click the mouse button and Lightroom will adjust the temperature and tint sliders based on that setting. The results are below.

The WB selector tool has set the Temperature slider to 3,950°. The image that I adjusted using my eye was set to 3,820°, so I was very close. This is a great tool if you have a gray point in your image. This tool is also the reason people will shoot with a gray card. When you shoot with a gray card, you simply have your subject hold up the gray card on the first image which will allow you to correct the WB on that image very quickly by simply using the White Balance Selector Tool and clicking on the gray card. You can then sync that WB across all of the images shot in that light. Click here to see a foldable gray card you can use to do this.
Using Saturation in the HSL Panel.
The final key to getting great color is color saturation. Saturation determines the intensity of color. The HSL panel in Lightroom has a saturation tab that will allow you to tone down specific colors within an image. You can also pump up specific colors, but we will save that for a different article at a different time. As I mentioned above, often people will try to fix the problem of too much red in the skin tones with the sliders in the white balance panel, but don’t do it! It should be done in the HSL panel, the panel that controls the Hue, Saturation, and Luminance of each color. The S of HSL stands specifically for Saturation, so when you click on the HSL panel, make sure to also click on the tab called ‘Saturation.’ Here you will see all of the colors in your image with a slider for each.

These sliders will allow you to saturate or desaturate a specific color. If you feel the skin is too red, then slide the red slider to the left to desaturate. Slide the red slider to the right to saturate. See how easy it is? And the beautiful thing about these sliders is that you are not affecting the other colors. Only the color that you are adjusting. You could also adjust the Hue of the reds in your image and make them more orange. This will turn the red in the skin to an orange tone, yielding better skin tones as well. You do this by selecting the Hue tab in the HSL panel and sliding it to the right.

Learn White Balance in Lightroom by watching.
Below is a video I’ve created to help you learn White Balance in Lightroom even better. Check it out!