Lesson 4: Adjustment Layers and Layer Masks
In Photoshop, some tools are used more often than others, and in this lesson, we cover two of the most useful tools in all of Photoshop, adjustment layers, and layer masks.
Often, people can be confused by layer masks, but they are not that hard if you understand a few simple things. The most important thing to understand about layer masks is this:
A layer mask is just that, a mask that covers or hides certain parts of a layer, and reveals other parts of the layer.
White is the color that reveals.
Black is the color that hides.
Gray, not entirely black and not quite white, will allow the blending of the layer with the one below.
It seems pretty basic, right? Let’s get specific now with masks.
For my example, I am using two images that I found at unsplash.com. You can download them here:
The sky image
https://unsplash.com/photos/viNPa2F7fnw
The Santa Monica Sign image
https://unsplash.com/photos/SHhVXFBLZk0
Download them, and let’s do the work together.
The first thing we will want to do is combine both images into the same document. Drag the sky image onto the Santa Monica sign image, which will give you two layers like the image below.

We need to get the sky layer below the sign layer. This is accomplished by first, clicking the lock icon on the background layer, which will change it from background to Layer 0 and allow a layer to be moved below. Once you’ve done that, then drag the sky layer below the sign layer.

Your natural inclination would be to use the eraser tool and bring erasing the white sky from the Santa Monica sign layer, allowing the sky below to be able to be seen through the layer.
This inclination would be wrong.
I know, I know, that would work, but that is not how we want to work.
We want to work in a non-destructive way. When you use the eraser tool on an image, you are permanently deleting those pixels from your document. You might be able to undo, but once you save and re-open the image, or get much further down the editing path with the image, reversing a previous mistake can become impossible.
This is the reason we want to work in a non-destructive way, which is why we need to use layer masks.
To create a layer mask, select the Santa Monica sign layer and then at the bottom of the layers palette, click the black rectangle with a white circle. This will create a layer mask.

Notice that the layer mask appears to the right of the image thumbnail on the layer and that it is entirely white. Remember from above that when a mask is white, it allows everything on the layer to be seen.
What this tells us is that in the image above, the Santa Monica sign layer has a mask, but it is not currently masking anything.
We want to change that.
We will do that by using the paintbrush tool. We want to paint directly onto the mask the color back to hide the white sky of the Santa Monica layer. Doing this will allow the sky layer below to show through all the areas that are painted black.

Look at that! I have removed the white sky and replaced it with a blue sky. I accomplished by painting black onto the mask over the white.
Just that simple.
Take a look at the mask. The sign is in white on the layer mask, signifying that we are able to see that portion of the layer. And, the surrounding area is black, demonstrating to us that this portion of the layer is hidden, allowing the lower layer with the sky to show through.

Make sure you understand layer masks before moving onto our next section, adjustment layers. This is because layer masks are very important with adjustment layers. Watch the video if you need to learn more.
Adjustment Layers
Now, let’s turn our attention to adjustment layers. Adjustment layers allow us to make non-destructive changes to our image and will enable us to return later to correct or fix any adjustment we made and now don’t like.
Take a look at the image below. It is a bit dark, and we want to brighten it up. Let’s do this with an adjustment layer. You can download it here.

You will find the adjustment layers located at the bottom of the layers palette in a menu designated by a circle that is half white and half black. Click that and select the Brightness/Contrast option. This will create an adjustment layer that will allow us to adjust the brightness of the image.
In the image below, I placed a red 1 in the location where you will select the Brightness/Contrast adjustment layer, and a red 2 by the newly created Brightness/Contrast layer.
I also placed a red 3 on the properties palette, which is where you will move the slider to raise or lower the brightness or contrast of the image. If you do not see the properties palette on your screen, in the menu across the top of your screen look for the Window menu, click it and select Properties.

In the properties panel, go ahead and adjust the brightness slider to brighten the image a bit. By changing the brightness here on this adjustment layer, no matter how many other edits we make, or even if we save the file and come back to it tomorrow, we can make continuous adjustments to the brightness –darker or lighter, no problem at all. This is the power of the adjustment layer.
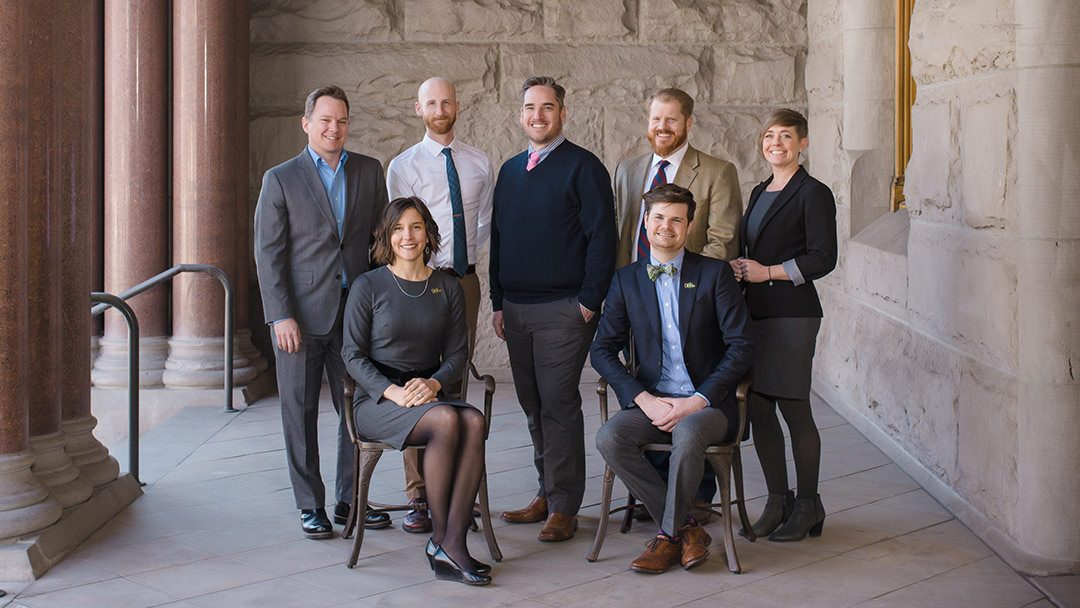
Let’s make one more change to this image. Remember, we want not to have the pavers below their feet be so bright. In essence, we want to lighten the picture, but not lighten the pavers below their feet.
To do this, select the brush tool, set the opacity to 20%, make sure your foreground color is set to back, have the hardness of the brush set to 0% (which means you are using a soft brush), and slowly paint black onto the adjustment layer mask.
If you don’t have the tool options across the top, go to the Window menu up to and select Options, towards the bottom of the list. And, to get to the brush options, right-click on the image with the brush tool selected.
Take a look at the image below to see the settings.

Making sure you have the mask selected, paint the color black with a large brush along the bottom of the layer to slowly remove the brightness from the pavers.

This technique allows you to change specific areas of your image without affecting the rest of the picture. This is powerful for photographers.
As a portrait photographer, I use this technique all the time to lighten just their faces or remove color casts from clothing, etc… Being able to change certain portions of an image selectively is a real benefit for a photographer.
Brightness/Contrast Adjustment Layer
This adjustment layer allows you to adjust the brightness and contrast of a layer or portion of a layer when used with a layer mask. This is one of the most often used Adjustment layers.
Levels and Curves Adjustment Layer
These two adjustment layers both adjust the brightness and contrast of a layer, but also are more powerful as well. With these options, you also can adjust the mid-point and even change the brightness or contrast of specific colors.
Vibrance Adjustment Adjustment Layer
The Vibrance adjustment layer allows you to adjust the Vibrance and the saturation of a layer. Saturation will saturate or desaturate all of the colors of an image. The Vibrance slider works only on the least saturated colors and also preserves skin tone.
This means that of the two, in portrait photography, the Vibrance slider is the best to use.
Hue/Saturation Adjustment Layer
In this adjustment layer, you can adjust the hue (color), saturation, and luminance (brightness) of all or a specific color in the image.
For example, if you wanted to make the reds in your image brighter, you would select ‘reds’ from the drop-down menu, and move the luminance slider up.
Color Balance Adjustment Layer
The color balance adjustment layer allows you to adjust the color in an image. This adjustment layer will enable you to get the color right of a specific image. For example, in the image below, it needs a bit more warmth so that it will print correctly.
Download this image so you can work right alongside me right here.

A quick adjustment of by adding some Cyan, Magenta and Yellow and the image looks almost correct.

But, notice her hand with the ring. It seems to bit cooler than the rest of the image.
This can be fixed with another adjustment layer adding yellow the image, but masking out the rest of the image and only warming up the hand.
I have done that in the image below; in fact, I warmed up both hands. Notice the mask on the second Color Balance adjustment layer, the only area of the image that layer is effecting is the hands.

There are more adjustment layer options, but I am not going to cover them here. The ones listed above are the adjustment layers most used by photographers. I will save teaching about the others to a later date and later time.